The first screen (Login Screen) that you see allows you to 'Login' to the system. This helps you password protect your confidential information. Your data is not encrypted, however. A knowledgeable person with the proper software tools can still access your data. The only absolute way to prevent anyone from accessing your information is to keep the hard drive that contains your information secure. When you first use the software, you should use the 'trial' account to practice. The user ID and password are already filled in for the trial account so just press the 'Select' button in the lower left corner.
You can also press two keys at the same time: 'ALT' and 'S'. This key combination is indicated by the line under the S in Select. An underlined character indicates that you may use a 'hot-key' combination to access a button.
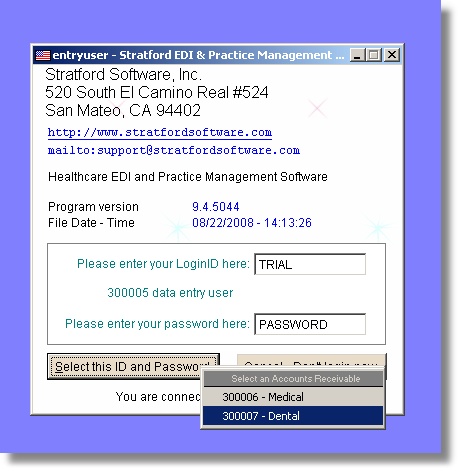
A small menu will appear. Click on 2 Dental to enter the demo medical account.
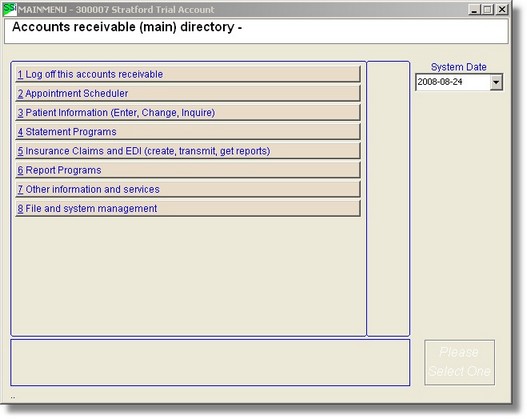
You are now in the Main Menu screen. Notice the date? It is set to today's date. This date will be used all through the software as a default. So if you are entering transactions for last Friday you can change this date to last Friday's date. You do this by clicking on the date text box. Enter the date that you want mo/dy/year. Do this so you won't have to type it in on the transaction screen.
The first exercise in this tutorial is to enter a patient.
From the main directory Select number 3 Patient information (Enter, Change, Inquire) You can press the 3rd button with your mouse or the key combination ALT+3.
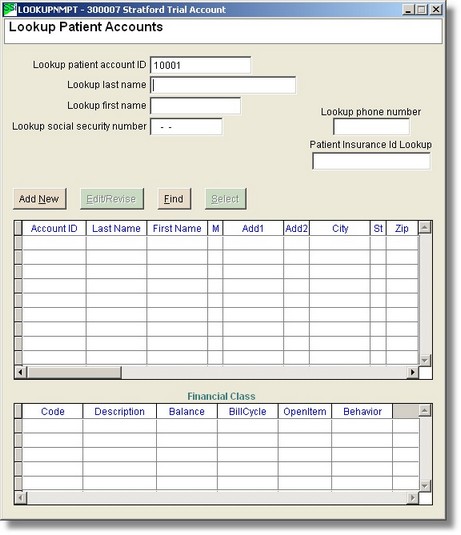
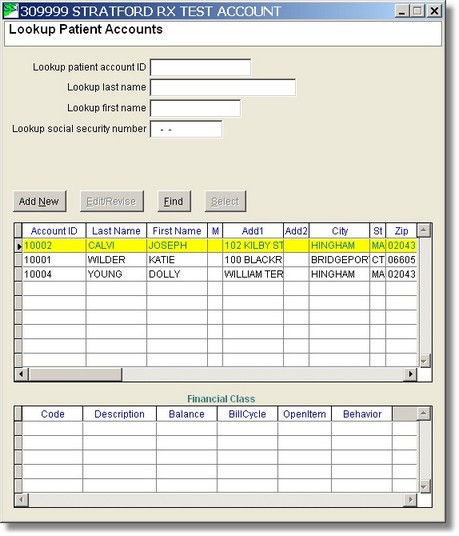
Next you will see a Lookup Patient Accounts screen that allows you to search for a patient using the account number (ID), last name, first name and/or social security number. If you are entering a new patient, from this screen you press the button labeled 'Add New' or the key combination ALT+N to go to the patient entry screen. You may also enter the account ID that you plan to use just to be sure it isn't already in the system. For this tutorial enter '10001' in the text box labeled 'Lookup patient account ID' and press ENTER. You will see a message box that says: 'I cannot find a match for 10001. Would you like to create a new code like this one?' The 'Yes' button is highlighted so you can press the ENTER key to select it. You may also press the 'Yes' button with your mouse or press the key combination ALT+Y.
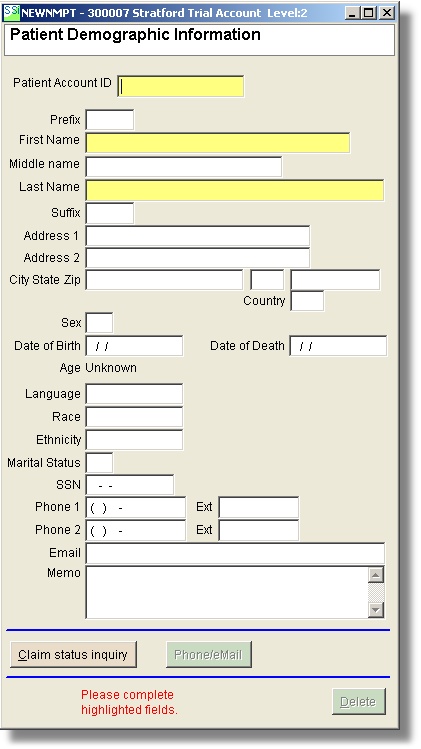
You are now in the Patient Demographic Information screen. This is the main edit screen that you will use to enter a new patient as well as inquire or change existing patients. Use the TAB key to go from one text box to another. Do not use the ENTER key as it may not allow you to leave an empty text box to go to the next text box. The ENTER key is used to select an item that is highlighted or something you enter in a text box. In order to enter a new patient you must assign an account ID, a first name and a last name. You will notice those boxes are in a different color. If a field is highlighted then information is required in that field.
You can easily come back to this screen to fill in any missing or incorrect information later. The account ID can be almost anything you can imagine including all alpha and numeric characters as well as spaces and some punctuation characters. For the account ID we will use '10001'. For the last name enter 'LAST NAME' and for the first name enter 'FIRST NAME' Enter whatever you want in the other text boxes.
| • | If you enter a state code that is not in the system, you will see the 'Lookup State Codes' screen. Since the state code you wanted is not already entered, press 'Add New' button. This will bring up the State Entry. Fill in all the information and click on the 'Save' button. Now click on the 'Select' button to select the state you entered |
| • | If you enter a new zip code, you will see the 'Lookup Zip Codes' screen. Since the zip code you wanted is not already entered, press 'Add New' button or the TAB key. |
If you press the TAB key, a question box appears: "I cannot find a match for .... Would you like to create a new code like this one. Select "Yes".
This will bring up the Zip Code Entry screen. Fill in all the information and click on the 'Save' button. You will then see the Lookup Zip Codes screen. The zip code you entered is already highlighted so press the 'Select' button with your mouse or the key combination ALT+S.
When you are back in the Patient Demographic Information screen. Finish entering the information and press the 'Save' button with your mouse or the key combination ALT+S.
You are now back in the Lookup Patient Accounts screen This time you can see the patient you entered. Since we need to enter more information about this patient, press the 'Select' button.
Because this is a new patient, you have not yet entered any financial information. This time the system knows that you must enter at least one financial class so you will see the Patient Billing Information screen before you see the Lookup Billing Accounts for this Patient screen. In the text box labeled 'Patient's financial class put the letters 'DC' for Denticaid and press TAB to go to the next text box. Since you do not have a financial class with a lookup code 'DC' in the system, the software 'thinks' you made a mistake or you want to enter a new financial class. You will immediately see the Lookup Financial Class screen.
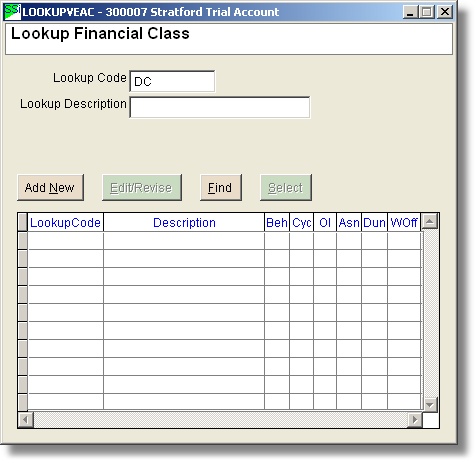
You are in the Lookup Financial Class screen. Notice that the letter 'DC' is already entered in the text box labeled 'Lookup Code' Press ENTER to select it and force the software to try to find it. You will see a message box the same as when you entered a patient ID above. It says: 'I cannot find a match for DC. Would you like to create a new code like this one? Again the 'Yes' button is highlighted to you can press ENTER to select it.
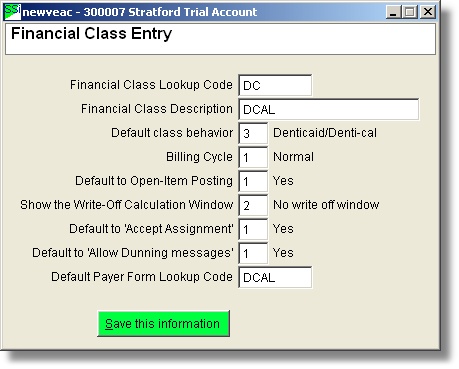
You are now in the Financial Class Entry screen. This screen allows you to build a financial class record that can be used over and over. Since this is for a financial class that you will use for Denticaid billing for many patients, you will want to enter information that can be used for most Denticaid patients. You can always change the financial class information for any specific patient in the patient's billing information screen. Again, the 'DC' has already been entered in the financial class lookup code text box so just press TAB to move to the next text box. Enter 'DCAL' for the financial class description. The software already knows a lot about Denticaid and so it will fill in the blanks correctly for most providers. But you can change any information if you wish. When you are finished press the 'Save' button.
You will see the 'Lookup Financial Class' the screen. Now you see the Denticaid financial class in the grid and it is already selected for you. Press the 'Select' button.

By now you may have noticed a pattern in this software. If you need to enter a code in a screen and that code does not exist, you will see a lookup screen that you can use to lookup a different code or you can enter a new code with its associated information. If you cannot find what you want, you can select 'Add New' to enter it. After entering the new lookup code and its associated information, you save it and return to the lookup screen. Here you can select the new code and return to the original screen where you wanted to use the code. With most other software packages, you must pre-enter all the information that you need in order to use it while doing patient entry. The Stratford program allows you to build all necessary information 'on-the-fly' and this is the way we recommend that you do it.
Now you are back in the Patient Billing Information screen. Notice the software has already entered the rest of the information. If any of this information needs to be changed you can do it now. Press the 'Save' button.

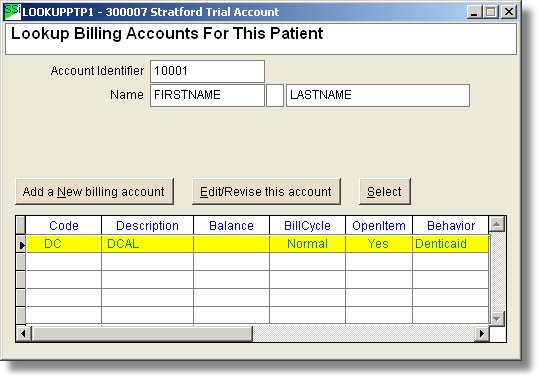
You are now in the Lookup Billing Accounts for this Patient screen. This lists all the billing accounts you have setup for the patient. In this case, you only have one: Denticaid. Press the 'Select' button.
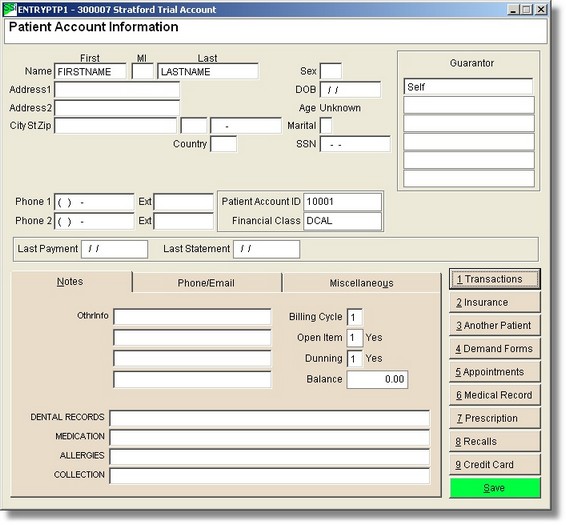
This takes you to the main Patient Account Information screen. Here you see the patient demographics as well as the information in the billing record. There are other optional fields that you can use.
This completes the patient entry with one billing information record. You can have as many billing information records as you wish. For example a patient may be a private pay patient while employed and then qualify for Denticaid when not working. Since the billing procedures for a private patient are different from a Denticaid patient, the best way to manage this is to enter two billing information records for the patient. This will allow the software to handle things differently when necessary with little or no assistance from you.
The next patient may be much easier to enter. If that patient lives in same city and zip code and is a Denticaid billing type, you will not see the screens for building the zip code and financial class records.
From the main Patient Account Information screen you can do your daily entry for all your patients. You can select 1 to enter transactions, 2 to enter insurance or 3 to go to another patient. You can also create demand forms such as statements and insurance claims for this patient. You can also create appointments and electronic medical records. This will be your main working screen for all patient data entry.
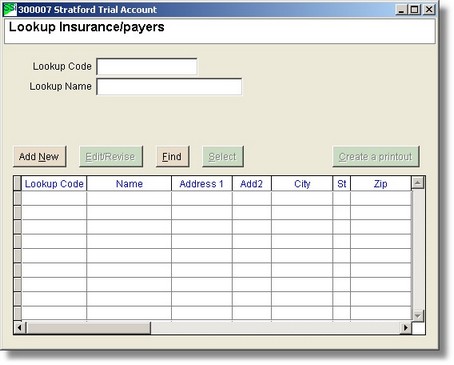
Let's enter an insurance for this patient. Press the '2 Insurance' button. Since you don't yet have an insurance for this patient, you will not see the usual screen. Instead the software will show you the 'Lookup Insurance/payers' screen. For this patient it will be Denticaid. Click on the 'Add New' button to add a new Denticaid insurance payer.
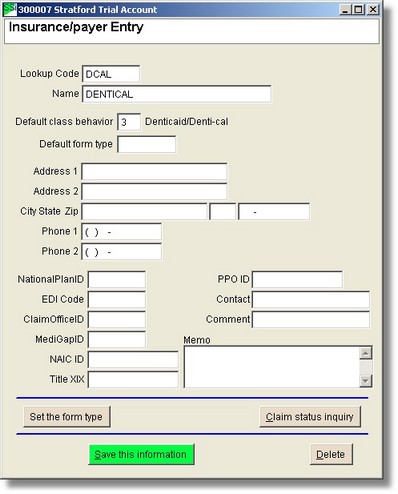
Now you are in the Insurance/Payer Entry screen. This screen can be used to build your first insurance record for this patient. The first thing that you must enter is the Insurance company/Payer. For the lookup code you could use 'DCAL' or whatever you wish. We will use 'DCAL' to avoid any confusion with the financial class (while you are learning). You should know that most people would use 'DC' here because it is easier and the software will not be confused or have any problems knowing what you want. For the payer name type in Denticaid. There are other boxes that may or may not need to be entered for your practice. When you are finished press the 'Save' button.
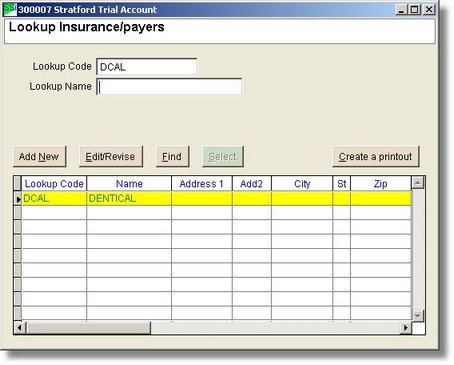
You are back in the Lookup Insurance, Payers screen. The DentiCal payer you entered is already highlighted so press the "Select' button.
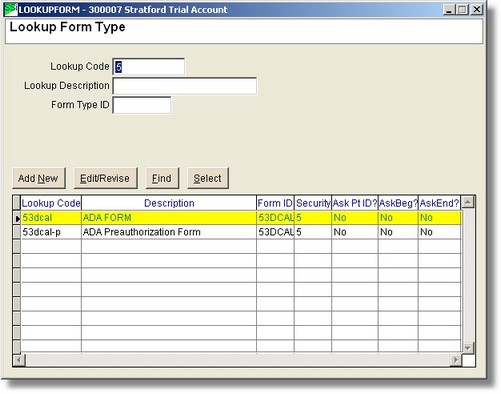
You are in the Lookup Form Type screen. Here you may see some insurance types already entered for you. If you see DentiCal, highlight it if necessary with your mouse and press the 'Select' button. If you don't see this form type, you will need to enter it. This trial version should already have DentiCal for you.
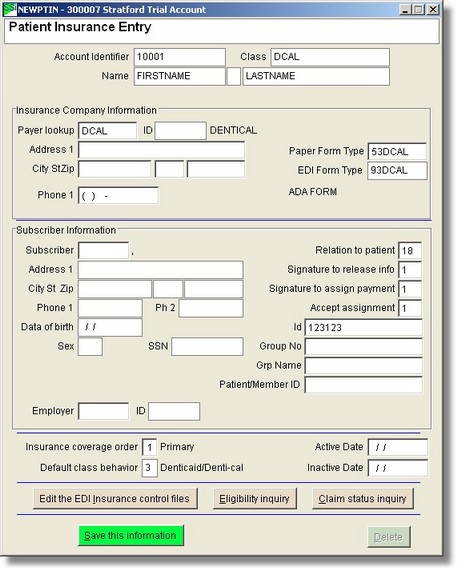
You are in the Patient Insurance Entry screen. You will noticed that there are a couple of fields highlighted in yellow. These would include the Relation to patient, Signature to release info ... etc. You need to fill out these text boxes with the correct information. For now just enter these values:
| • | Relation to patient: 1 |
| • | Signature to release info: 1 |
| • | Signature to assign payment: 1 |
| • | Accept assignment: 1 |
| • | ID: (enter their DentiCal ID#) |
These fields are related directly to the ADA Claim form. If you want more information regarding these fields see Patient Insurance Entry. Click on the 'Save' button to save these information when you are done.
You are new in the Lookup Insurance Coverage for this Patient .You should see the DentiCal insurance you entered listed.

This completes the entry of the first insurance for this patient.
Press Escape to leave this screen and return to the main patient information screen.
You are back in the main Patient Account Information screen.
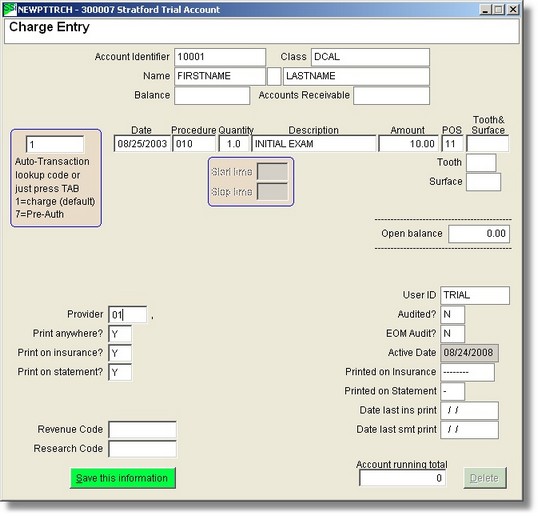
Let's enter a transaction for this patient. Press the '1 Transaction' button. Since you don't yet have a transaction for this patient, you will not see the usual Lookup Patient Charges, but instead you will be shown the Charge Entry.
You are in the Charge Entry.
Enter "1" for a charge or press 'TAB' key in the Auto-Transaction lookup code field, which should be the only text box highlighted in yellow.
You will see the default date already entered. This is the date that you put on the main directory screen. You can change it if you want or press 'TAB' to go to the next box.
You must enter a Procedure code. After you enter the procedure code press TAB. If the software knows the description of the procedure code you enter, you will go on to the next box.
If the software does not know the description of the procedure code you will see the 'Lookup Procedure Codes' screen. You can click on 'Add new' button in the Lookup Procedure Codes screen, to add new procedure codes. Fill out the information in the Procedure Code Entry entry screen, and click on the 'Save' button. You should be back at the Lookup Procedure Codes, where you can click on the 'Select' button to select the new code you just entered.
The Modifier (of the procedure code) is optional. You can enter up to 4 or just press TAB to go to the next box.
Enter a quantity or press TAB to default to 1 and go on to the next box.
The description should already be filled in. Press TAB to continue.
Enter the amount. $100.00 can be entered as '100'. The software will default the cents to 00. Press TAB to continue.
You can enter a ToothSurface code here. If the software knows the description of the code, you will go on to the next box. If not, you will go to the 'Lookup ToothSurface' screen where you can enter new codes.
In the next field enter a provider lookup code. Use any alpha-numeric code you want. For this tutorial, we will enter 01. Press TAB to continue. The system does not have a record for that provider so the program will bring up the 'Lookup Providers in this Practice' screen. To add the new provider, click on the 'Add new' button to bring you to the Provider Entry screen. When entering information for an DDS, do not put the DDS after the last name. Put the title (DDS, MD, PHD, etc) in the Title box.
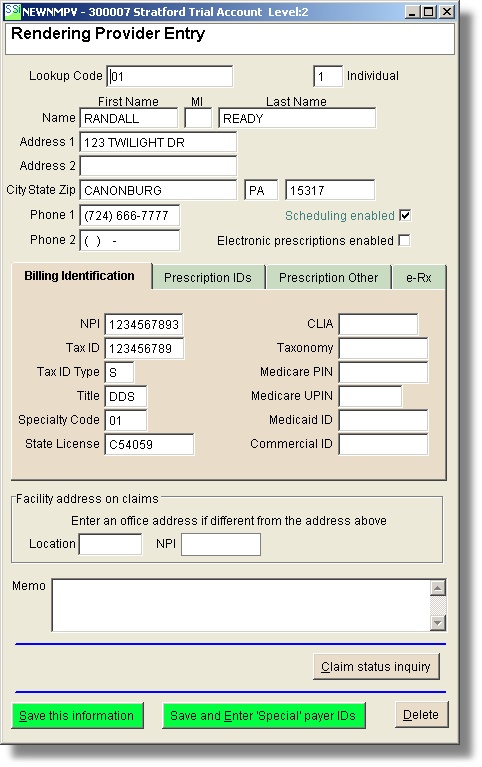
After you save the provider information, a box will appear that asks you "This provider is not setup for appointments. Do you want to add this provider to the schedule now?". Click on "Yes". The 'Appointment Schedule List Items' screen should appear.
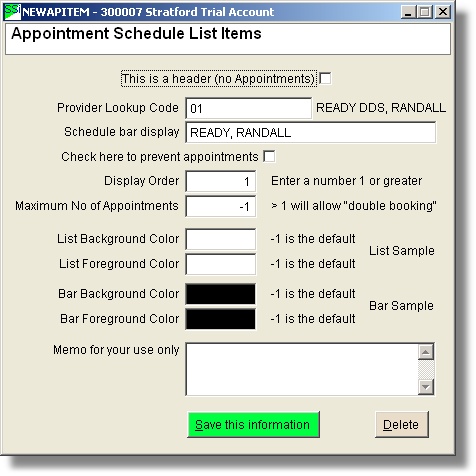
The information should be already be filled in so all you need to do is click on the 'Save this information' button. Now just Select the new provider you added.
Generally, there is no need to answer the remainder of the questions in the Charge Entry screen. You can answer them if you wish. Press the 'Save' button.
You will now go to the Lookup Patient Charges screen.
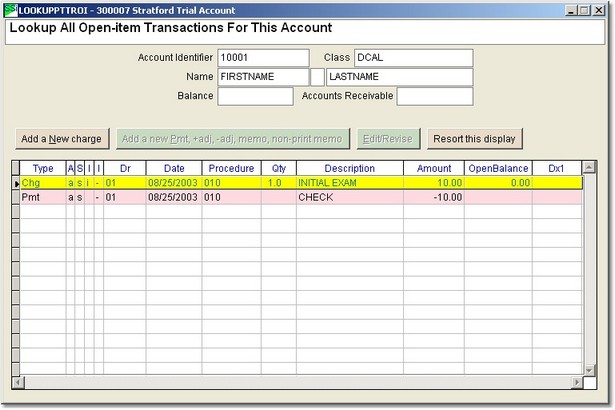
You will see the charge you entered. You can now enter another charge if you want. To enter a payment/adjustment/memo press the 'View transactions posted to this charge' button.
If there are any transactions posted to this charge, you will go to Lookup Payments-Adjustments-Memos which is similar to the other lookup screens above. If this is the first transaction to be posted against this charge, the software will begin collecting information for the Payment-Adjustment-Memo Entry screen which will open automatically. In the first field you select the number that corresponds to the type of transaction you wish to make. Then advance through the fields entering the other pertinent information.
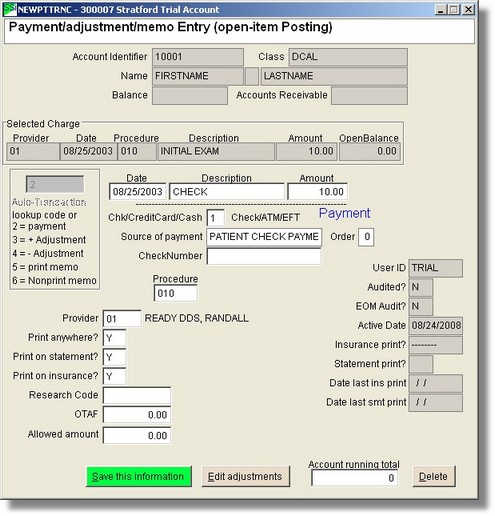
After the payment is entered, you will go to the Lookup Payments-Adjustments-Memos. When you are finished entering payments, adjustments, or memos, press the Escape key. Again press the Escape key when in the Lookup Patient Charges screen and you will be back at the main Patient Account Information screen.
This completes the entry of the first transaction for this patient.