If your payer requires you to show the start and stop times on your paper claims
this section may be helpful.
Problem:
1. You have entered an 'anesthesiology' charge (service) transaction.
2. The payer that will receive your claim for payment of this charge requires you to show the start and stop times on the claim.
Solution:
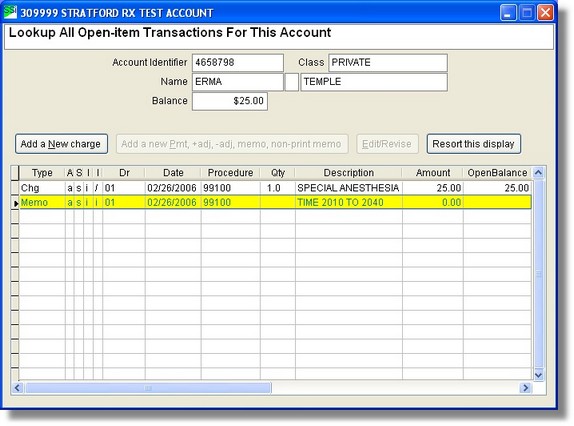
Have the charge show like any other charge.
Immediately follow the charge with a 'memo' line that states something like this:
TIME 0920 TO 1640
The payer will interpret this to be '24 hour time' that means the procedure/service started at 9:20AM and ended at 4:40PM.
You can (of course) enter the memo line manually.
To have the software enter this memo automatically for you with the Stratford program you must set up a 'custom' auto-transaction. There is another section in the manual that shows how to work with auto-transactions. Here is an quick 'walkthrough'.
First select from the main directory: #8, then #4.
You will see the screen titled: Lookup Auto Transaction.
To be sure you do not already have the necessary transaction, put 'ATIME' in the 'Lookup code' text box and press the 'Find' button.
If this transaction exists you will see it in the grid.
If the transaction does not exist, press the 'Add New' button.
You will then see this screen:
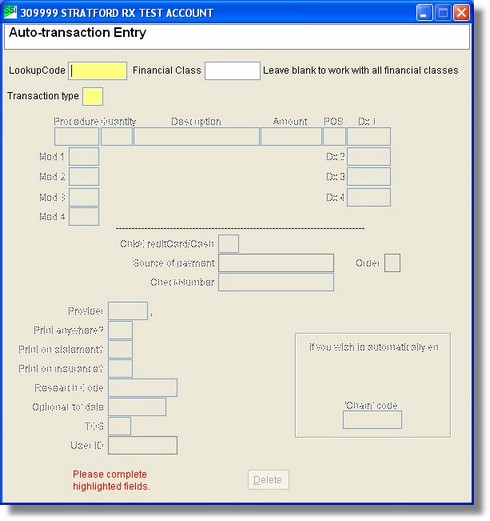
| 1. | Type 'ATIME' in the 'Lookup code' text box. |
| 2. | Type '5' in the 'Transaction type' text box (this means 'Printing memo'. If you are not familiar with all the types of transactions, you can right click on this text box to see a listing. A 'Printing memo' is just what it sounds like: A memo line that will print on statements and insurance claims. |
| 3. | Type 'TIME' in upper case in the 'Description' text box. and nothing else. If you do not type in the word 'TIME' in upper case (and nothing else) you will get the auto transaction after entering the charge, but you will need to manually type in the time that you want. It is your decision, automatic our way or manually your way. We are interested in feedback on this feature. |
You must set the transaction up like this or it will not work. This is by design. For example, you may wish to have a printing memo with a description that starts with the word 'time' but it is not for the purpose we are discussing now.
Other things you can do to customize this auto-transaction: (but are definitely not suggested for the purpose of printing time on claims)
You can put a lookup code in the 'Financial class' text box. This could limit this transaction to use with only a specific financial class.
You can enter a provider number. This might be helpful if you always or almost always use this line with one specific provider. Remember, anything you enter on this screen will appear automatically when you use it while entering patient transactions. It is a 'template'. Of course you may change anything when you use it, however, the purpose of an auto-transaction is to save you some work.
Your finished screen is ready to save and use:
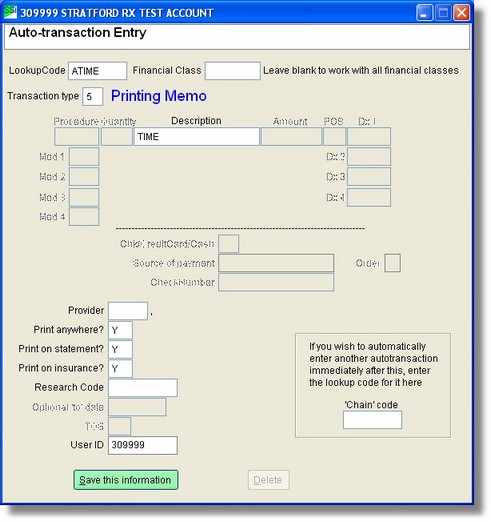
Pretty easy, wasn't it?
Note: this process only works with NEW CHARGES - NOT WHEN YOU ARE REVISING EXISTING CHARGES - otherwise, you would end up with several memo lines - one for each time you revise. If you want to change the memo for an existing charge, you must do it manually.
Note: this process only works with database classes "6MD" (physician/supplier) and "6ANES" (anesthesiology).
Now when you are in a patient transaction screen you can enter your charge as usual:
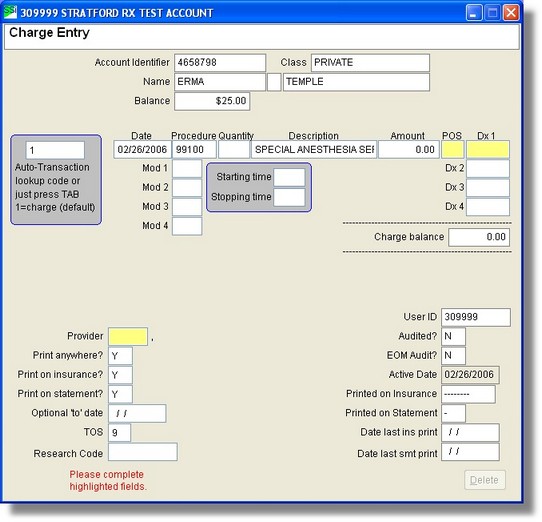
The procedure code (and modifier if present) is identified as an 'Anesthesiology' service that requires the time to be shown on claims. The small area near the center of the screen is enabled so you can enter the start and stop times. These text boxes are specially designed to accept the time and so can accept some abbreviated entries. For example if you enter '92' it will show 0920. 092 will also show 0920. 201 will show 2010 (8:10 PM - remember this is 24 hour time) Do not use a colon when you enter 24 hour time. Some people do use the colon to separate hours from minutes, but that is not the 'official' way to show 24 hour time. Reserve the colon for '12 hour' time.
NOTE: You must enter a start and a stop time or the auto-transaction will not enter the time for you and you will need to enter it manually. You can still use the ATIME auto-transaction but you will need to type in the description.
NOTE: If you enter a stop time that is earlier than the stop time, the program will assume that it is for the next day, but will prompt you to be sure.
After you enter the start and stop time and the other required information and press the 'Save' button, you will see the next screen so that you can confirm that the auto-transaction worked as you wanted:
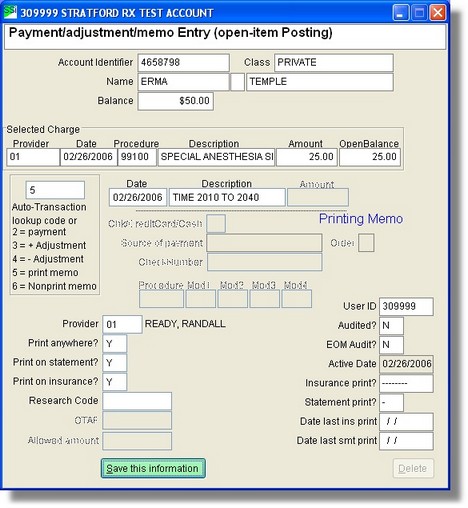
Most likely you will not need to do anything here except press the 'Save' button. The description is now filled out with the start and stop times, the provider name and other information has been carried over from the charge transaction.
Next you will see the lookup screen with your two transactions: