To enter a new patient, you or the computer must first assign an account number to the patient. You have two choices:
1. Type the account number that you want
2. Let the computer assign an account number for you.
If you are entering your patients from ledger cards, you should write the account number assigned by the computer or selected by you on your ledger card now. Use a brightly colored marking pen so the number is noticeable. This will help you avoid entering the same patient twice or forgetting to enter a patient.
| 1. | Log into the Stratford Program using your ID or if this is your first time logging into the program read the Entering a new Patient tutorial. |
| 2. | Select the option for Patient Information. |
| 3. | Click the Add New button on the Lookup Patient Accounts screen. |
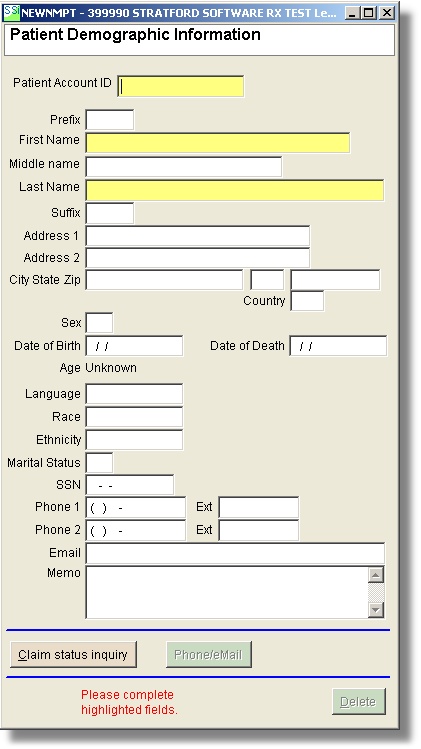
| 4. | This will take you to the Patient Demographic Information screen. Here you must type a Patient Account ID, which can be used to identify that specific patient in the future. Also you must enter the first and last name. After you have entered all the data the Save this Information button will appear. Click on Save this Information to finish. |
SSI®Note:
| • | A new sequential account number can be added by entering "." (period) in the Lookup Patient Account ID field. |
| • | If you want to reset the counter for the next sequential number, enter the number symbol "#" followed by the last used account number. For example if you want your counter to start with the number 999, you would enter #998. Then the next time you enter "." [ENTER] the next assigned account number will be 999. |
| • | The account number can consist of both number, letters, spaces, and even character symbols (!@#$%^&*-+=<>?~). |
Enter the Patient Account ID, which can be used to identify that specific patient in the future. This will also serve as the Lookup Code for this patient in the Lookup Patient Accounts screen. Fill out the rest of the information about the patient.
When you are finished filling out the information click the Save this information button. You will then be at the Lookup Patient Accounts screen.
From here you may schedule appointments for this patient by pressing the Edit/Revise button and selecting the 5 appointments button on the lower right hand corner of the screen.
NAME
The number of available characters for the first name is 15, which means that you can type beyond what appears to be the end of the field.
DO NOT put a period after the middle initial because there is only one space available for the initial. If you put in a period, you will see a period for the middle initial. If the patient lacks a middle initial just bypass the text field.
The field for the last name has 25 characters
TELEPHONE NUMBER
You have two lines available for telephone numbers. When you are entering the patient's home telephone number and work number, you do not need to put in the area code. The program has a zip code index that cross-references area codes. The only time you need to enter the area code is if it is different from the default area code.
SSI® Note Do not put in any dashes, parenthesis, or spaces in the telephone numbers; the program will fill these in for you.
BIRTH DATE
The program assumes that the patient was born in the year 1908 or later. For the date of 1908 or later, enter only the last two digits of the year (e.g., if the patient was born on September 23, 1908, you would enter the birthday as 092308). If the patient was born before 1908, you must enter the entire year. For example, if the patient's birthday is December 25, 1893, you would enter this date as 12251893. The program automatically calculates the patient's age.
SSI® Note Do not put slashes or dashes in when you type the birth date.
SOCIAL SECURITY NUMBER
SSI® Note Do NOT put in dashes or spaces; the program will fill in the punctuation.
SEX
You may enter "M" for male and "F" for female.
MARITAL STATUS
The marital status have the following values:
Marital Status Code
1 Single
2 Married
3 Widowed
4 Divorced
5 Unknown