We are assuming here that you have already gone through the "Enter a New Patient" tutorial. If you have not gone through the "Enter a New Patient" tutorial, please go through that tutorial before continuing on this one.
There are two primary ways to enter the Appointment Scheduler. Select number 2 from the main directory or press the appointment button in the main Patient Information screen.
The appointment schedule screens are larger than most of the billing screens. We recommend a minimum resolution of 1024 X 768 so that you are not required to 'scroll' to see all the screen.
If you select number 2 from the main directory, you will go immediately to the scheduler and you will see today's schedule by default.
We assume you entered a new patient and a charge for that patient. This means you will already have a provider in the system.
From the Patient Account Information screen.
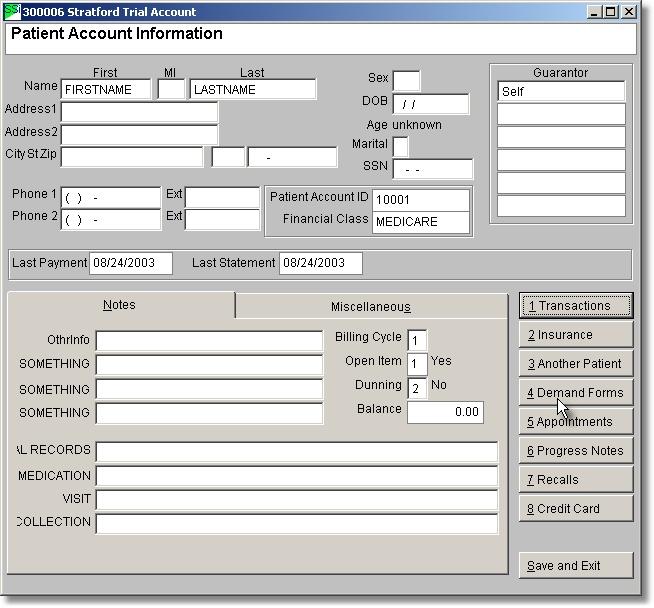
Press 5 Appointments
You are in the Appointment Entry screen. The patient information is already there because you came from the patient information screen. You must enter a Provider for this appointment. In our example from the "Enter a New Patient" tutorial, we added a provider 10001. So enter 10001 in the provider text box.
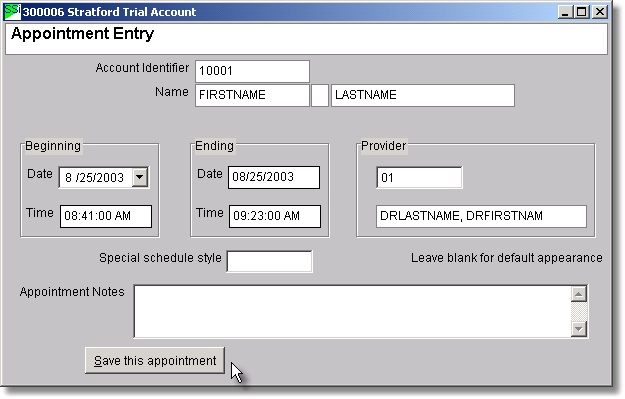
An appointment is already setup for today at 8:15. This is OK if the patient just walked in the door and it is 8:15. More than likely it is not, so here are some hints to make any necessary changes:
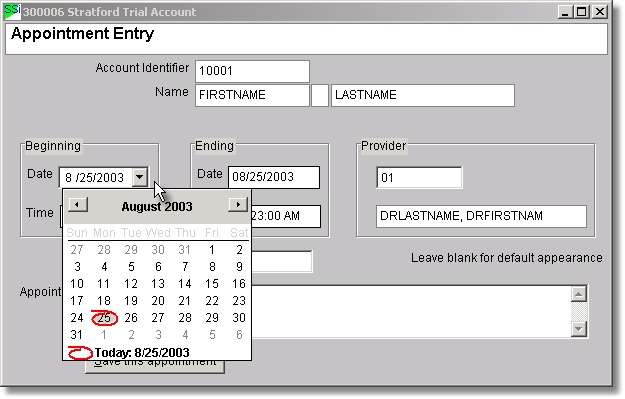
Date: Highlight the month, day or year. Now you can use the up and down arrows on your keyboard to make quick, small changes. If you press the down-arrow button next to the date field, a calendar will appear so you can select the day from any month and/or year. This is exactly the same feature when you try to change the beginning and ending dates when you demand an insurance claim. (see Creating Insurance Claims Tutorial ).
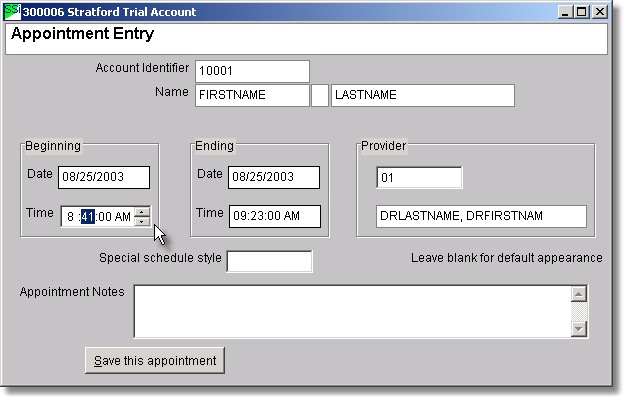
Time: Highlight the hour or minute then use the up and down arrows on your keyboard to make quick, small changes or you can type in the number you wish. There are buttons next to the time that allow you to adjust the time with your mouse. The scheduler will ignore the seconds.
Provider: The scheduler will not accept an appointment without a provider. If you enter a provider lookup code and that provider code is not setup for appointments, you will be shown the Lookup Providers in this Practice screen.
| • | Be sure to choose "Yes" when asked "Do you want to add this provider to the schedule now", when you decide to add a new provider. This will lead you to the screen specifically designed to create a place on the schedule display for this provider. |
Note: For the Appointment Notes, you have more room to write than you see on your screen. A new screen will appear if you need extra room enter more text. Enter anything you wish. This memo like all text boxes is linked to the Windows clipboard so you can copy information from other Windows programs and paste it here.
Press 'Save' on this form and you will go to the Lookup Appointments screen. This shows all the appointments for this patient.
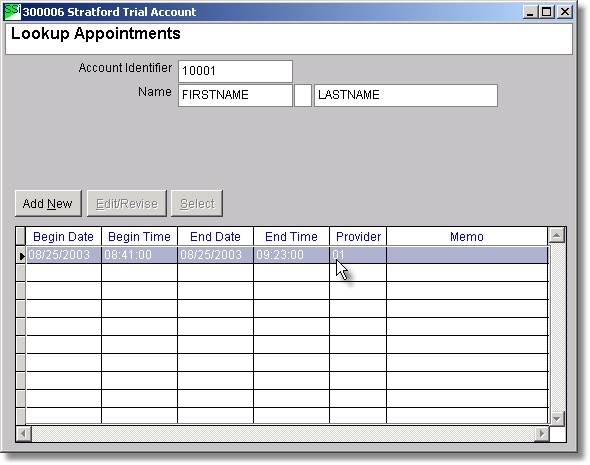
You have completed the entry of the first appointment.
We will now assume that you are in the Main Menu (Physician) screen. Select 2 Appointment Scheduler This shows you the Appointment Scheduler for all patients in one graphic display.
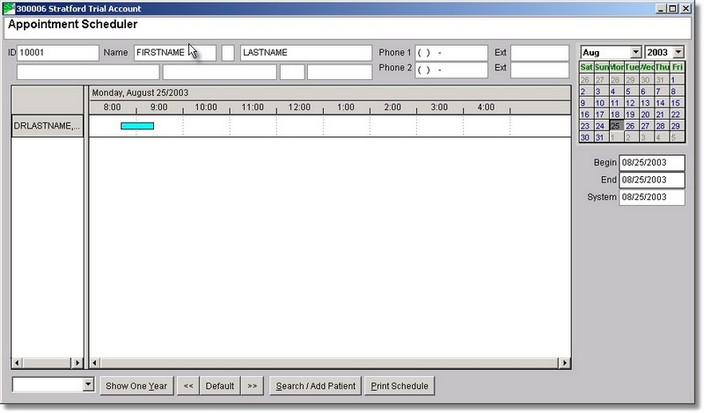
If you went through the first part of this tutorial, adding appointments from the Patient Account Information screen, you will notice a cyan bar on the scheduler. This bar represents the appointment you added from the Patient Account Information screen.
Warning!: This is the step that may cause you problems if you do it before entering a patient and a charge. You need to setup a provider to complete this part. If you don't have a provider setup go through the "Enter a New Patient" tutorial.
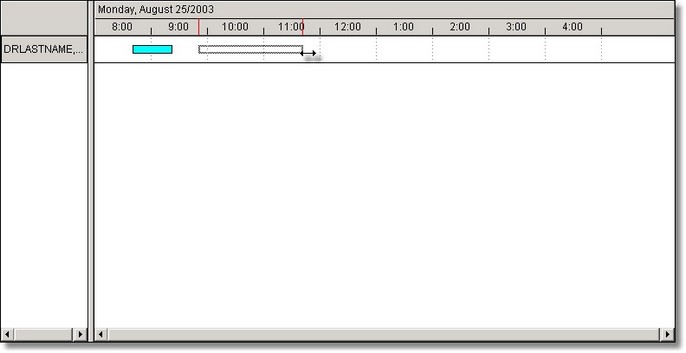
To add an appointment simply click and hold down the left mouse button on or near the starting time and drag the cursor to the ending time. For our example you click and hold down the left mouse button near 9:30 and drag it near 11:30.
Once you let go of the left mouse button you will get the Schedule Appointment Entry screen:
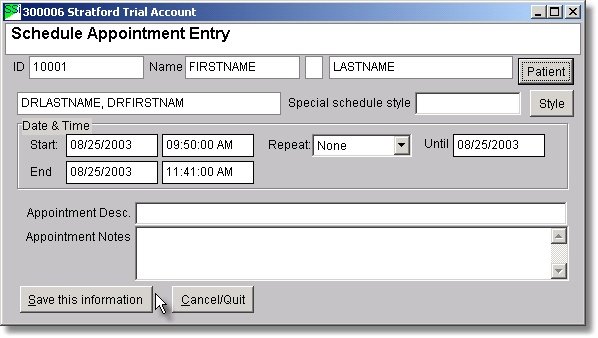
Now you can select a patient by clicking on the "Patient" button. Select a patient and click on "Save this information". You should immediately noticed a new display bar in the Appointment Scheduler .
Note: You do not have to select a patient in order to enter an appointment. For example you want to schedule a time for lunch. You can simply just type "Lunch" in the Appointment Description. box.
You can edit this new appointment by right-clicking on the new bar. A menu will appear where you can edit/delete the appointment or the modify the patient's information.
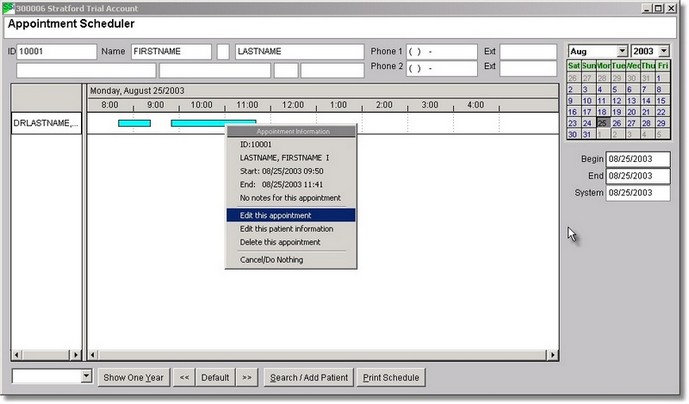
You can move the appointment bar by holding down the left click mouse button on the appointment bar and moving the mouse up, down, left or right. Once you release the left mouse button the appointment will stay at the new location.
You can change the appointment display dates by :
| • | Changing the beginning and/or ending dates |
| • | Clicking a different date on the calendar at the right hand part of the screen. |
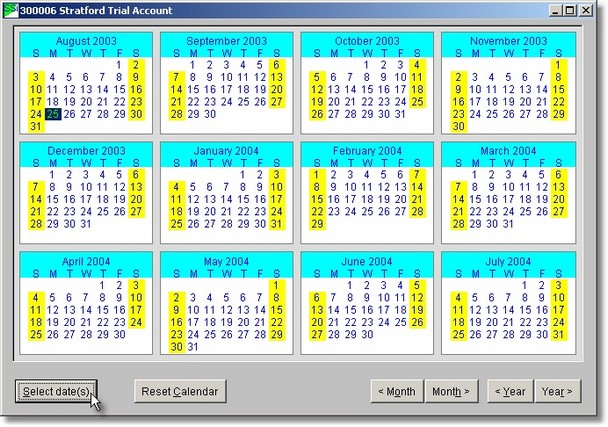
| • | Click on the 'Show One Year' button and a display will appear with all of the dates for the next 12 months beginning with the current month. To select a date click on it and then click the "Select Date(s)" button and the appointment scheduler for the new date will appear. |
This scheduler is an important tool that may take some time to become familiar with all of its functions. Other features that you can do that will not be covered in this tutorial are:
| • | Creating an appointment and repeat copies of it until a certain date by setting the repeat box in the Schedule Appointment Entry form. |
| • | Adding different items other than a provider by right clicking on the list of providers on the right on the Appointment Scheduler |
| • | Changing the color of the appointment bar on the Appointment Scheduler by creating a new "Style" in the Schedule Appointment Entry screen. |